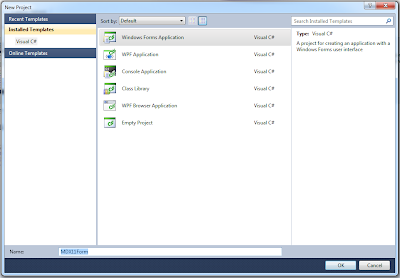
Setting up the project
On the SlimDX website there a up to now 3 simple tutorials for the basic setup of a windows form with SlimDX. I will use parts of this tutorials to show you how to setup a simple form.
After installation of Visual C# Express and SlimDX SDK, start Visual C# Express and go to File
and click New Project.
Select Windows Forms Application and choose a name for your Project (MDX11Form in my case).
Add a reference to the SlimDX.dll by navigating to the Solution Explorer, right click on References and
choose Add Reference.
I will use the .NET Framework v4.0 and use the x64 Platform.
Now you have a Windows Forms Application with Reference to the SlimDX library in it.
You can hit the compile Button already but this will not look any different than your default application
after creating a new Windows Forms Project.
Setting up the device
Navigate to the Solution Explorer again, right click on Form1.cs and choose View Code.
Your code should look like this:
using System;
using System.Collections.Generic;
using System.ComponentModel;
using System.Data;
using System.Drawing;
using System.Linq;
using System.Text;
using System.Windows.Forms;

namespace MDX11Form
{
    public partial class Form1 : Form
    {
        public Form1()
        {
            InitializeComponent();
        }
    }
}
Add the following lines to your using Directives:
using System;
using System.Collections.Generic;
using System.ComponentModel;
using System.Data;
using System.Drawing;
using System.Linq;
using System.Text;
using System.Windows.Forms;
using Resource = SlimDX.Direct3D11.Resource;
using Device = SlimDX.Direct3D11.Device;
using SlimDX;
using SlimDX.Direct3D11;
using SlimDX.DXGI;
using System.Threading;
Add these declarations to your form:
 public Device device;
 public SwapChain swapChain;
 public Viewport viewport;
 public RenderTargetView renderTarget;
 public DeviceContext context;
Add the method createDeviceAndSwapChain to your code:
public void createDeviceAndSwapChain(System.Windows.Forms.Control form)
        {
            var description = new SwapChainDescription()
            {
                BufferCount = 1,
                Usage = Usage.RenderTargetOutput,
                OutputHandle = form.Handle,
                IsWindowed = true,
                ModeDescription = new ModeDescription(0, 0, new Rational(60, 1), Format.R8G8B8A8_UNorm),
                SampleDescription = new SampleDescription(1, 0),
                Flags = SwapChainFlags.AllowModeSwitch,
                SwapEffect = SwapEffect.Discard
            };
            Device.CreateWithSwapChain(DriverType.Hardware, DeviceCreationFlags.None, description, out device, out swapChain);

            // create a view of our render target, which is the backbuffer of the swap chain we just created
            using (var resource = Resource.FromSwapChain<Texture2d>(swapChain, 0))
                renderTarget = new RenderTargetView(device, resource);

            // setting a viewport is required if you want to actually see anything
            context = device.ImmediateContext;
            var viewport = new Viewport(0.0f, 0.0f, form.ClientSize.Width, form.ClientSize.Height);
            context.OutputMerger.SetTargets(renderTarget);
            context.Rasterizer.SetViewports(viewport);

            // prevent DXGI handling of alt+enter, which doesn't work properly with Winforms
            using (var factory = swapChain.GetParent<Factory>())
                factory.SetWindowAssociation(form.Handle, WindowAssociationFlags.IgnoreAltEnter);

            // handle alt+enter ourselves
            form.KeyDown += (o, e) =>
            {
                if (e.Alt && e.KeyCode == Keys.Enter)
                {
                    swapChain.IsFullScreen = !swapChain.IsFullScreen;
                }
            };
        }
Adding a render method
public void renderScene()
{
  while (true)
  {
    context.ClearRenderTargetView(renderTarget, new Color4(0.25f, 0.75f, 0.25f));
    swapChain.Present(0, PresentFlags.None);
  }
}
Adding a render thread
Add a declaration for a render thread:
Thread renderThread;

public void init()
{
  renderThread = new Thread(new ThreadStart(renderScene));
  renderThread.Start();
}
Finishing Up
public Form1()
{
  InitializeComponent();
  createDeviceAndSwapChain(this);
  init();
}
Cleaning Up
public void shutDown()
{
  renderThread.Abort();
  renderTarget.Dispose();
  swapChain.Dispose();
  device.Dispose();
}

private void Form1_FormClosing(object sender, FormClosingEventArgs e)
{
  shutDown();
}
Download
You can download the Project here:


Hi, nice tutorials please keep them coming!
ReplyDeleteThere are two minor things that need touching up in createDeviceAndSwapChain, factory and texture2d have the wrong caps (should be Factory and Texture2D).
Thank you for your comment. I corrected the typos.
Deleteviewport is declared as a class member variable, but in the body of CreateDeviceAndSwapChain() a local variable called viewport is created. Consequently, the viewport member variable is never used and the local viewport variable goes out of scope.
ReplyDeleteTexture2d is still missing a capital D.
Does the Form1_FormClosing() event handler need to be assigned to the Form1.FormClosing event?
And why is everything public?